Monday, March 11, 2013

Philly Coal Piers

Yesterday I got the opportunity to do something awesome and different for me - I met up with other photographers in the area and headed to an awesome location in Philly to do a photoshoot.  The Coal Piers are off the beaten path, and definitely a little interesting to get to, but it was so worth it.  We went down a dirt road, turned the corner, and encountered this graffitied abandoned structure right on the river with beautiful light and things to climb on and lean against.

The location was awesome, everywhere you turned there was something different, and a totally different feel.  We had a few models along who were incredible and beautiful and a total joy to take pictures of.  It was a new experience for me, to get to pose people, and I definitely learned a lot from watching some of them ore experienced girls.  Overall, a total blast.  Here's a selection of my shots from the day.  Which are your favorites?

(click the image to see larger)

Friday, March 8, 2013

Flounder in Parchment

Hey there friends!  I'm back with a recipe this time.  Sometimes, (ok, most times) after eating lots of junk/bad food, I get the desire to go back to basics and eat something simple but tasty.  Last night, I finally had some time to cook.  Unfortunately, I didn't really have much food in the house since I haven't been around to go grocery shopping.  Thankfully, we've been doing pretty well though with keeping some stuff in the freezer, and keeping certain dry goods on hand so there was enough for me whip something up with a little creativity.

I made this with flounder fillets (first time cooking flounder actually), but any sort of thin mild fish (like tilapia) or thin chicken breast would work equally well.  This also could be a great dish for a dinner party since the presentation is pretty, without it taking any additional effort.  That's always a win in my book.  This turned out really tasty and definitely was a nice pick me up after the past few weeks of eating out. Here we go:

Flounder Cooked in Parchment
Serves 2
Ingredients:
(2) thin fillets of flounder (or other fish/chicken) (4-6 oz each)
(1-1/2) TBS Olive Oil
Few sprigs of rosemary (or your preferred herb)
(4) thin Lemon slices
(1/2) Cup white wine
(2) Carrots thinly sliced
(1) Medium onion thinly sliced
Salt and Pepper
(1/2) Cup dry Quinoa
(1) Cup Water

To Do:

- Preheat the oven to 400 degrees F
- Put the quinoa and water in a small pot on the stove and cover.  Turn the stove to high heat until the water comes to a boil.  Once it's at a boil, lower the heat so it's just simmering.  On my gas stove this means I take the heat down most of the way. (If I was Anne Burrell on Worst Cooks I'd be chanting "Bring to boil, reduce to simmer"and dancing, but I'm not, so obviously I don't do that. Right.)  Keep an eye on it, but around when the fish is done all the liquid should be absorbed by the quinoa, rendering it done.
- Slice your carrots and onions and lemon
- Grab 2 pieces of parchment paper or aluminum foil, about 9"x12" each.  Fold them in half, like a book.  If we were comparing types of folds, this would be a hamburger fold, not a hot dog fold
- On one half of each parchment drizzle some of the olive oil, then sprinkle some salt and pepper
- Lay each fillet on top of the oil, moving it around and flipping it over so the oil and seasoning gets on both sides
- Place the fish in the center of the parchment side.  Place your carrots and onions on top of the fish.  I like to spread them out over the whole fish so it's covered.
- Take (2) lemon slices for each fish, and put them on top of the carrots and onions.  Then take some of the herb sprigs and place them around the lemon. (If you keep the herbs on their stems it's easier to remove after cooking so you don't get a mouthful of overpowering herb)
- Pour half the wine over each fish
- Now we create the packets.  Fold the one side over the fish, then fold/roll the 3 remaining sides so they stay closed and enclose the fish.  You want it to stay closed so the fish gets cooked by a combination of steam and baking.
- Put your 2 fish packets on a baking sheet and place them in the middle rack of the oven.  Set your timer for 15 minutes
- Once the fish is done cooking, place some quinoa on each plate.  Give each plate a fish packet, let sit for 2 minutes, and then carefully unwrap.  Enjoy the steam that rises, and bite into your tasty fish

And now some photos!


I hope you enjoy!  Let me know how yours turns out.


Tuesday, March 5, 2013

Shooting 101 Course at Clickin Moms

Yesterday I mentioned sharing photos from the Shooting 101: Best Darn Beginner Course class I took on Clickin Moms this past month.  Don't let the name shock you, I haven't magically/randomly become a parent yet.  However, this site/forum/classes has provided a great photography community geared towards women (most of whom are moms, but it's not required thank goodness) and features tons of great tutorials and other useful information for taking your photos to the next level (and I am most definitely not paid to say that).

I decided to take this Shooting 101 course because I wanted to make sure I really had all of my basics down.  I've been shooting in manual since the summer, and I understood a lot of the basics (Exposure Triangle, basic composition, importance of white balance) but I knew there were some gaps missing.  I wasn't nailing all of my photos in camera, and definitely required a lot of lightroom editing to fix wonky white balance.  This class has rave reviews and I figured it was worth it to figure out where I stand and see what I should focus on learning next.  Here's where that crazy unpredictability of my life comes into play.  I figured February would be a good time to take the class since typically it's a slow month for theatre and corporate events.  So I signed up thinking I'd have lots of time to complete the assignments. And you can guess what happened...I ended up very busy, and actually out of town for 2 of the 4 weeks.  I pushed through it though, and managed to turn in an assignment every week.  If you're considering an online class to really learn to use your SLR, I would highly recommend this one. Lynne Rigby, the instructor, provides great feedback and all of her materials are informative (plus her kids are really cute) and the community of fellow classmates made it a great experience for me.  I can't wait to take another workshop, the question just becomes what to try next.

Anyway, I thought it would be fun to share some of the pictures I used for the class, which not only shows my progress, but also gives an idea of how I've been spending the past month.

Week 1 - Taken in DC while working an event in a hotel. The only time I went outside was to get the picture since I needed one with outdoor light.


Week 2 - It turns out I can get some great window light in my room, which is nice since most of my apartment has no windows!


Week 3 - A combo of gymnastics and my trip up to Syracuse (Go Orange!!!). For purposes of this blog post I did fix the White Balance on the gymnastics one.  I forgot to change it in camera and she was a little blue.  This 2 second fix makes me like it better


Week 4 - Also taken in a hotel, cause work can be crazy like that.  I fixed the WB here too for blog purposes.  But I love how blue her eyes are.

And there you have it!  I hope you enjoyed, and maybe I've encouraged you to check out and take a workshop.  Feel free to ask me any questions and also to leave any feedback :)
Until next time....

Monday, March 4, 2013

P52 - Weeks 6-9

Wow.  Long time no blog.  It's been a crazy month work wise, I've felt a bit like a pinball bouncing between different cities for work.  I'm sorry I've been neglecting this space, but it's been all I can do to make sure I even get my photos taken, let alone posted.  Also, I took a Shooting 101 course over at Clickin Moms and it's been crazy getting those assignments done.  Don't worry, I'll post my progress from that course soon!  Also to anyone looking for recipes, hopefully I'll be home a bit more this month and will have time to cook and thus post some of the things I make.  I miss making tasty things for dinner and having a good lunch - chinese and pizza gets old very quickly, especially when you want to be healthy but long work days don't quite allow for creative lunching (or you have no say in what's provided).

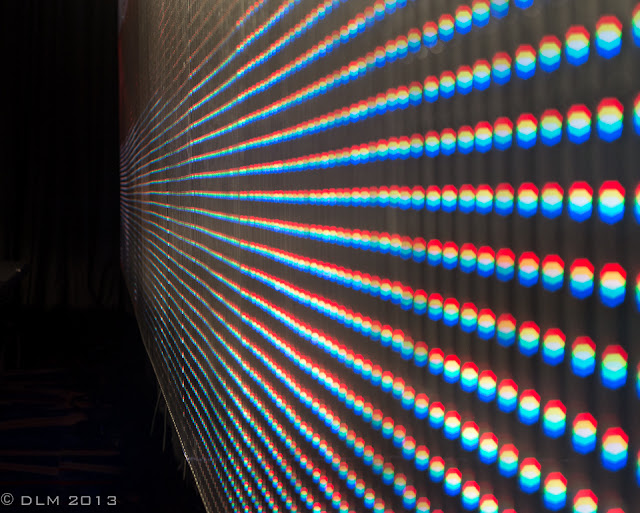
Anyway, what you really come here for, the photos! (Or you like listening to me ramble, but for some reason I doubt that).  The theme for Week 6 was texture.  I took this photo while working on an event in Washington DC.  At the back of the stage was a large LED wall and it made for an interesting texture.
Week 6 - Texture

Next up, Week 7, where the theme was Symmetry.  This fell around Valentine's Day, and I thought this heart fit the theme perfectly.  I know it's upside down, but I still think it gets across the idea of being a heart and expressing love.


Week 7 - Symmetry

Week 8 brought us the theme of Shadow.  I was a little stumped on this one since I wanted to be creative and not just take a picture of my shadow outside, or have a photo where shadows fell across someone's face awkwardly.  Then I found this shot I took of my fireplace with fire blazing and realized it could totally work! I thought it was funny that this was only the 2nd time I've used the fireplace in my apartment, and I did it unintentionally for the picture.  But hey, I'm totally going to take it.
Week 8 - Shadow

And finally, to catch us up, here's Week 9 - Glass.  This one came about at the end of a very long work week, where at the end up the day we'd been aiming colored lights at a beautiful chandelier in the center of a hotel ballroom.  On my way out, I went to the lobby where you could look down on the chandelier, and there were these beautiful glass beads hanging around them.  I couldn't resist and grabbed my camera to capture the beads with all the color and reflection.  I hope you like it as much as I do!
Week 9 - Glass

And that's where I am right now. This week seems a little calmer (famous last words, I know) so stay tuned for a post about my Shooting 101 course!